How To: Create a Poll?
Explore how to create a poll with different question types, additional poll settings, submission windows, student interaction settings, and display options.
Atomic Polls can be embedded anywhere Canvas supports the rich content editor.
To embed and create a new Poll, click Atomic Poll from the external tool button dropdown in the rich content editor toolbar. This will open an editing window to begin creating a new poll.

Figure 1: Atomic Poll external tool option
Create a Single Question Poll
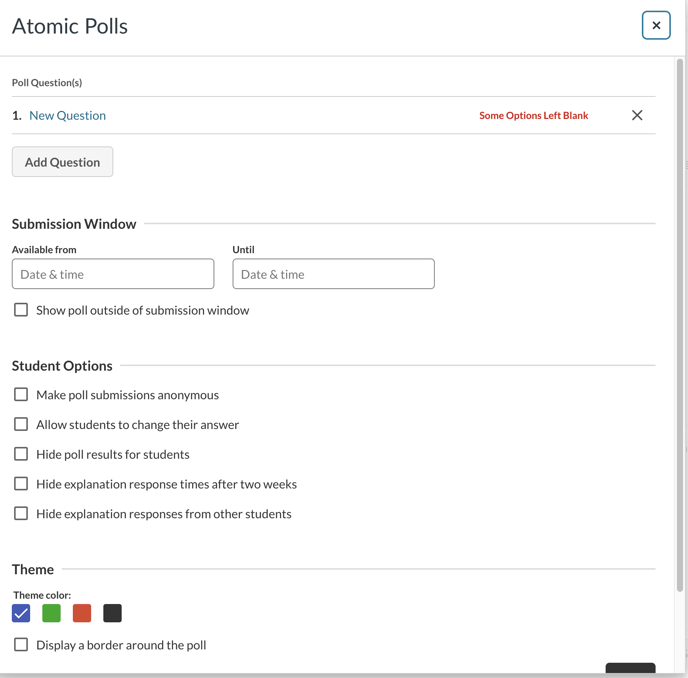
Click on New Question to edit a new question.

Figure 2: Poll settings
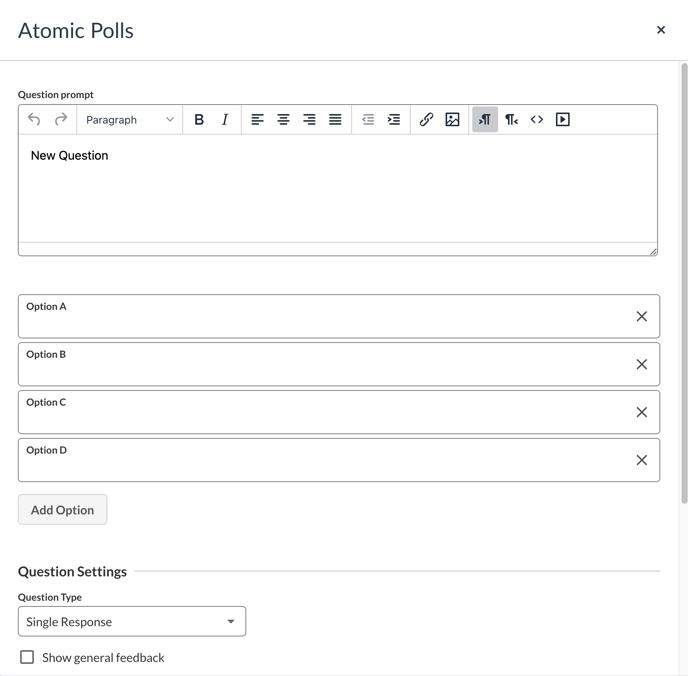
- Add the question prompt. You can use the rich content editor in the poll question prompt to format text and add media.
-
Enter response options for the poll.
-
Click the X button to the right of an option to delete it.
-
Click the + Add Option button to create another option.
- Click Save and the poll will be embedded in the page on Save.

Figure 3: Poll question editor
Create a Multi Question Poll
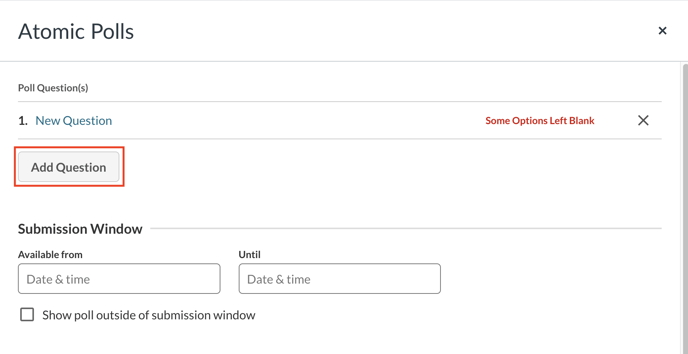
Click Add Question to add questions to create a multi question poll. Once you have added at least two questions, you will see some additional settings related to Multi-Question polls in the Edit screen.

Figure 4: Adding a question in a Poll
Multi-Question settings
-
Poll display logic
-
By order – when this option is selected, display the questions on the poll in the order they are configured
-
Random – when this option is selected, display the questions in random order
-
-
Navigation arrows
-
Choose to show the navigation arrows above the poll questions, to the sides of the poll questions or to hide them.
-
-
Paging indicator
-
Numeric with words, when selected shows in the format “Question 2 of 4”
-
Numeric, when selected shows in the format “2-4”
-
-
Switch poll automatically
-
The poll will automatically advance to the next question after a certain amount of time has passed. This time is defaulted to three seconds and you can have a max of ten seconds.
-
-
Allow Cyclic Navigation
- This allows students to use either of the navigation arrows to cycle through the questions.
Additional Poll Settings
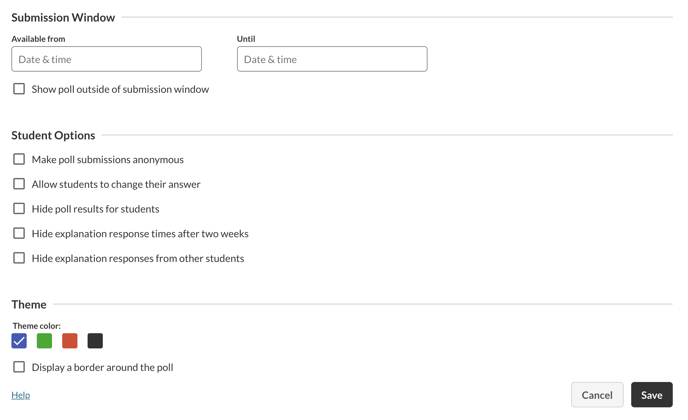
You can configure additional settings in the main Edit screen of the poll. These settings alter the behavior of the entire poll.

Figure 5: Additional poll settings under the Edit screen
Submission Window
You can lock a poll so that students can only submit responses during a certain time frame. The Available from sets the unlock time of a poll and the Until time sets the future lock date of a poll. Students will see a message saying the poll is locked and the unlock date when configured.
Selecting the Show poll outside of availability window will allow students to see the poll questions and options but not submit a response.
Student Interaction
These settings will change how student can interact with the poll
-
Enable anonymity - Students names will be obscured and respondents will have a student number in place of their name
-
Hide the results for respondents - After selecting an option students will not be able to see the class results of the question, they will only see their response.
-
Hide response times after 2 weeks - After two weeks the poll results will be hidden from students
-
Allow respondents to change their answer - allow students to change their votes after they have submitted.
Display
You can alter the display of a poll by selecting one of the four color options (blue, green, red, black) or by configuring the poll to have a border.
