
Dynamic Questions - Dynamic questions are Atomic Assessment questions that use data table parameters. Parameters can be used in any question type, turning it into a dynamic question. To turn a question into a dynamic one, define the parameter names and values and insert parameters into the question stem and scoring criteria.
Data Tables - Data tables are spreadsheet-like tables that define the parameter names and values to be used in questions. You can define data tables in the following ways:
- Manually creating them.
- Using the Math Question Generator question type.
- Creating and running data table scripts.
Dynamic Question Example
Instead of asking a question: What is 3 + 5 ? You can use a data table to define parameters A and B and specify multiple possible rows of values for those parameters.
A, B
3, 5
7, 9
10, 7
Then, when you write the question, you use the parameters instead of hardcoding the values. So it becomes:

Figure 1: Dynamic question with parameters A and B
After you have defined a data table for an item, you can insert parameters from the data table into a question by choosing them from the Data drop-down button displayed in the rich content editor. Note that the drop-down only appears if a data table is defined for the item.

Figure 2: Editing a question using a data table
Manually creating data tables
To manually create a data table for an item:
- Create a new item or edit an existing item.
- Use the three dot menu to select Data Tables.

Figure 3: Adding a data table from the three-dot menu - Enter a header row for the table, specifying parameter names and separating them with commas.

Figure 4: Data table header row - Enter rows specifying values for the parameters, separating them with commas.

Figure 5: Adding entries to a data table - Select Add Script

Figure 6: Select Add Script - If there were no errors in the format, the csv data will display as a table and the Apply button will become active. Resolve any errors and click the Apply button.

Figure 7: Apply the Data Table - Add the parameters to the question. You can add the parameters in the Formula Template or the Edit Math window.

Figure 8: Adding parameters from the Formula Template
Figure 9: Adding parameters in the Edit Math window - Add parameters to the question solutions. Select Add Condition.

Figure 10: Select Add Condition - Select the Value field to view the number pad and choose the parameters from the data table dropdown.

Figure 11: Adding parameters to the solution
It can sometimes be easier to generate tables using a spreadsheet program, downloading a CSV of the table, and copying and pasting it into the Data Table user interface.
Item Data Table Scripts
An item data table script is a script associated with an Atomic Assessment item that can be run to update the data table for the item. Atomic Assessment data table scripts support Javascript format and provide functions to specify the names of the data table columns (setColumns) and to add rows to the table (addRow).
To create and use a data table script for an item:
- Edit an Item and go to the Data Table tab.
- Click the Add Script below the Data Table.
- Enter a script that specifies the columns and rows for the data table.
- Run the script and preview the result using the Preview tab.
- After the script runs successfully, click the Copy button to copy the results to the Data Table.
- Save the script.
- Apply the Data Table changes.

Figure 12: Using a Data Table Script
Data Table Script API
Data table scripts can use most Javascript functions. In addition, Atomic Assessments defines functions that you need to use to specify the column names and the row values for a data table:
setColumns(column_names) - Specifies the names of the data table columns.
- column_names must be an array of strings specifying the names of the data table columns.
addRow(row_cell_values) - Adds a row to the data table.
- row_cell_values must be an array of values for the row being added. It must have the same number of elements as the array passed to setColumns.
In addition, it defines two functions for generating random values.
getRandom() - Generates a random number between 0 and 1.
seed(seed_value) - Specifies the seed for the random number generator. If you do not call this function or call it with different values, the randomly generated values will be different each time you run your script. It is important to use the same seed each time so that your table values will remain the same. It is important not to change your data table values between when students take an assessment and when you score or rescore it.
- seed_value value to seed the random number generator with. It must be a number.
Simple script example. A simple example that adds two rows is:
setColumns(["slope","intercept"]);

addRow([3,5]);

addRow([7,-2]);
When you run this script, it will generate a data table with two columns, named slope and intercept and two rows with values 3,5 and 7,-2.
Random generation example script. You commonly use loops to generate multiple rows by randomly generating numbers or selecting from lists. For example:
function round(value, decimal_places){

  return value.toFixed(decimal_places);

}

function randomValue(min, max, decimal_places){

  return round(min + getRandom()*(max-min), decimal_places);

}

function randomItem(list){

  var selection = randomValue(0, list.length-1, 0);

  return list[selection];

}

function randomColor(){

  return randomItem(["red","green","blue"]);

}

function randomSlope(){

  return randomValue (-3, 5, 1);

}

function randomIntercept(){

  return randomValue (-10, 9, 0);

}

setColumns(["color","slope","intercept"]);

seed(55);

const rows = 10;

for(let i=0; i<rows; i++){

  addRow([randomColor(), randomSlope(), randomIntercept()]);

}
Running this table will generate a table with three columns named color, slope, and intercept and 10 rows, with randomly generated values.
Course Level Scripts. To avoid repeating and maintaining the same code in multiple item scripts, you can write code at the course level that will be prepended to your item scripts before they are run. This can be a good place to put helper functions. To use course-level scripts, you must:
- Ask your Atomic Jolt Customer Support Manager to enable course-level scripting.
- Navigate to the Atomic Assessments Content Manager in your course.
- Bulk Update Item Scripts are available in the three-dot menu at the top right.
- Enter your Course Level Data Table Script in the editor.
- Click Save.
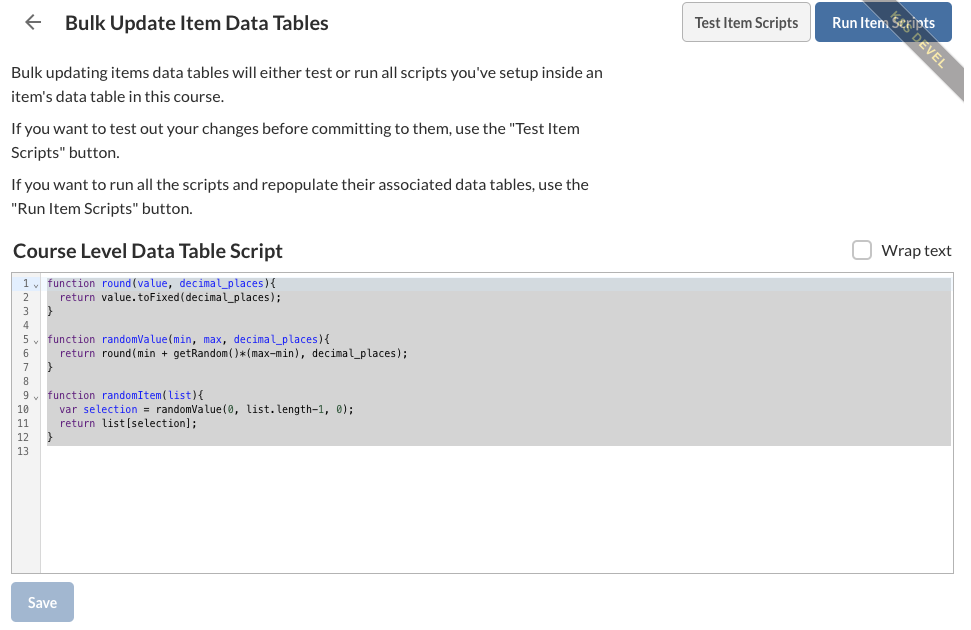
Figure 13: Bulk Update Item Data Tables
You can also bulk-test and run all item scripts in a course from this screen.
Adding a Custom Initialization Script
You can supply Atomic Jolt with an initialization script to add custom functionality to your data tables, such as retrieving data from Google, declaring helper functions (ex. roundUp, roundDown). An initialization script is not required to run data table scripts.
To add a custom initialization script navigation, ask Atomic Jolt to enter your custom code that you want to have available when running your items scripts. Please note that any code entered in here will be run before every item script.