
Assignment settings allow you to configure how an assignment is presented and behaves. This article will provide more information on each setting and how they work.
You can save any assignment configurations you like as a preset or you can set your own defaults. This is recommended to save time during the assignment creation process. To learn more, view the article on using presets and setting your own defaults.
TABLE OF CONTENTS
Basic Assignment Settings
Basic assignment settings will vary the most between assignments. These settings include the total points possible for your assignment and whether or not you want student submissions to automatically go to the gradebook. You should double-check these settings before students start the assignment.
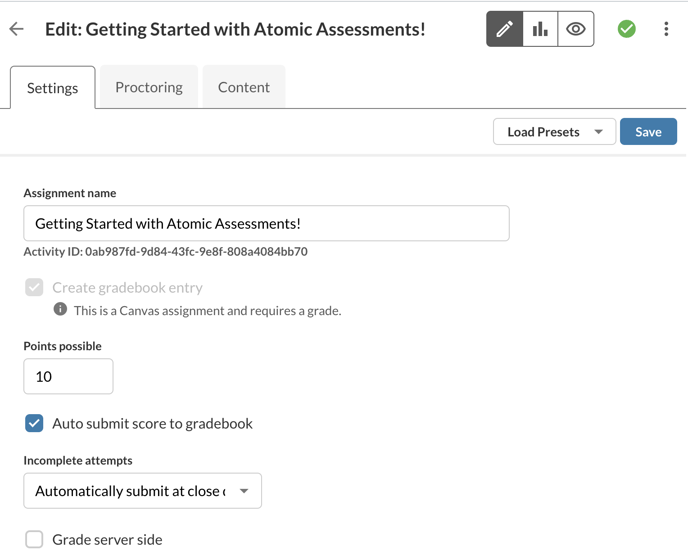
Figure 1: Basic Assignment Settings
Assignment Name
Name of the assignment. If the assignment is configured to create a gradebook entry, the LMS Assignment will also be given this name.
Create Gradebook Entry
If this option is checked, Atomic Assessments will automatically create an entry in the LMS gradebook for the assignment. This can't be changed after the first assignment save.
Points Possible
Total points possible for this assignment. Atomic Assessments will scale student raw scores based on this value before sending them to the gradebook.
Auto-Submit Score to Gradebook
The score will be automatically sent to the gradebook after a student completes an attempt.
Grade Server-Side
This option prevents any question validation information from being sent to the client at any time and computes scores server-side rather than determining grades on the browser. While this prevents any scoring information from being sent to the browser during the activity or during review, round-trip calls to the servers can decrease performance and response time.
Note: Selecting the grade server-side option will not display feedback for custom question types when clicking Check Answer, it disables the feedback options for correct/incorrect answer highlighting, it will not allow the use of the Give Up button, and will disable the showing of correct answers until the review page.
Assign to Settings
Overrides allow you to set multiple, distinct assignment terms to accommodate different students and sections that have access to the assignment.
Each Override box will only apply those settings to the users in each Override box. You can add additional Overrides by clicking the Add Override button.
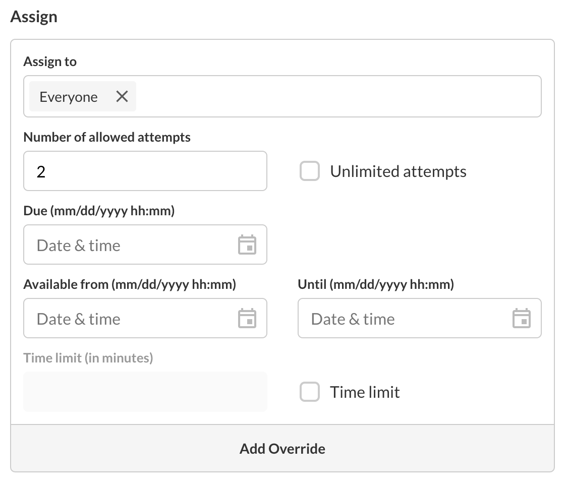 Figure 2: Assignment Override box
Override Settings
Assign to
Determine which users this override applies to.
Number of allowed attempts
Set for the number of allowed assignment attempts this/these user(s) get when taking this assignment. Check the box for Unlimited attempts.
Due
This date determines when this assignment is due for the assigned users. Users can submit attempts past the due date but it will be considered late.
Available from
This date determines when this assignment becomes available to the assigned users.
Until
This date determines when this assignment becomes unavailable to the assigned users. Users cannot submit attempts past this date.
Time limit (in minutes)
Set a time limit specific to the assigned users. The assignment will be automatically submitted after the time limit has passed.
More Options
The settings under the More Options section will allow you to alter the experience of your assignment from the default assignment settings.
To access these additional settings expand the menu by clicking on the More Options arrow at the bottom of the Basic Settings section.
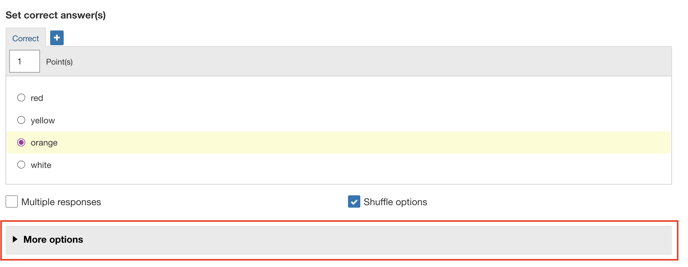
Figure 3: More Options
General Settings
These settings will alter the student experience of an assignment.
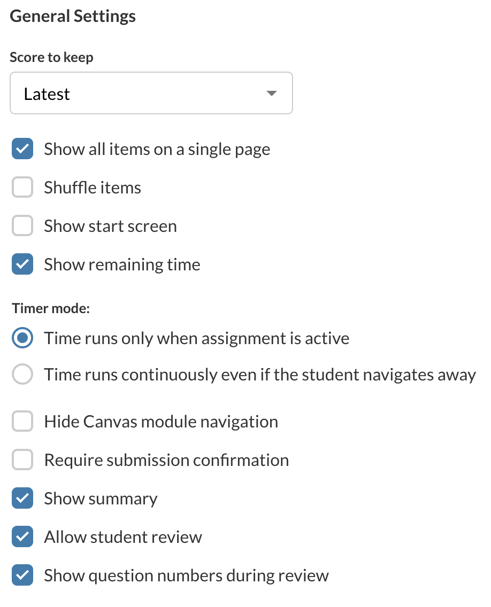 Figure 4: General Settings
Score to Keep
You can specify which score to keep when multiple attempts are set for an assignment. The Latest score is kept by default.
- Highest: The student's highest score out of all attempts will be kept as the final score.
- Latest: The student's most recent score will be kept as the final score.
- Average: The student's average score out of all attempts will be kept as the final score.
Show all items on a single page
All items and questions will be shown on a single page. This option overrides page and section breaks.
Shuffle items
Items will be shown in a different order to each student.
Show start screen
A screen with a Start button will display when a student first clicks into the assignment. Any time limits will not start until the student clicks Start.
Show remaining time
The remaining time (if a time limit is specified) will be shown in the top right corner. If enabled, this helps students manage their time more efficiently.
Timer mode
Time runs only when the assignment is active - The timer will not run unless a student is actively taking the assignment. If the student leaves the assignment in the LMS and navigates somewhere else in the LMS the timer will pause.
Time runs continuously even if the student navigates away - The timer will keep running in the background for the assignment if the student leaves the assignment and comes back to it.
Hide Canvas module navigation
Hide the previous/next navigation below the assignment when students are viewing canvas modules. When the student reaches the assignment, the module navigation at the bottom will disappear until the assignment is submitted.
Require submission confirmation
A confirmation button will display asking the student to confirm before submitting the assignment.
Show summary
Students will see a summary (score, previous attempt details, retake, and/or review buttons) at the end of the assignment. When disabled, students will only see the questions with their answers (the review screen).
Allow student review
Students will be able to review their answers and feedback on any of their previous attempts. If disabled, they will see a message instead saying that their assignment has been submitted.
Show question numbers during review
Items and questions will be numbered when students review their attempts. Items with multiple questions will be separated using a period. Ex. Question 2.1, 2.2, 2.3 etc.
Question Settings
These settings allow you to configure check answer buttons and question attempt penalties. You can set check answer attempts on all questions or you can specify it by Item.
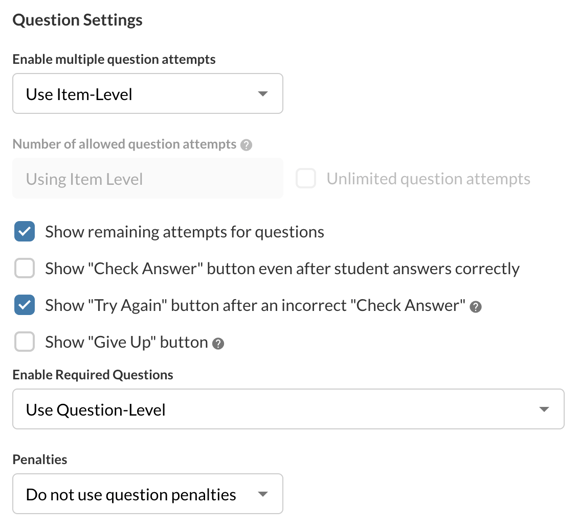
Figure 5: Default Question Settings
Enable multiple question attempts
You can configure multiple question attempts for the entire assignment, by Item, or have them never show.
- Use Item-Level: Question attempts will be determined by what is configured on a per-question basis in Items. In order for the check answer button to appear with this setting, make sure you have configured the Check answer button and set the number of Check answer attempts for all the questions you want to allow multiple attempts on.
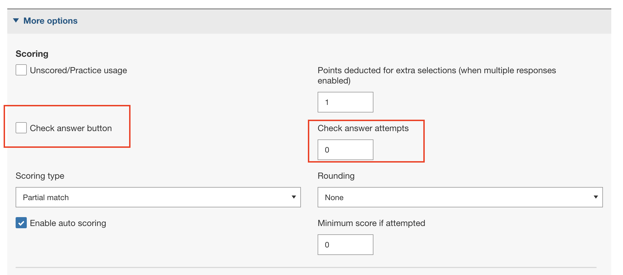
Figure 6: Question-level check answer settings under More Options
- Never Show: The check answer button will never display and will ignore the question level check answer settings.
- Always Show: The check answer button will display for every question. This will override any item-level setting for this assignment only.
- Number of allowed question attempts - Students will be able to attempt each question the number of times specified here. This is only available when the setting Enable multiple question attempts is set to Always Show.
- Unlimited question attempts - Students can attempt a question an unlimited amount of times. This is ideal for practice.
Show remaining attempts for questions
The number of remaining attempts for each question will be displayed at the bottom left of each question.
Show Check Answer button even after student answers correctly
If a student has answered correctly, the Check Answer button will continue to display.
Show Try Again button after an incorrect Check Answer
After a student clicks the Check Answer button and the answer is incorrect, a Try Again button will display. When the Try Again button is clicked, any highlighting and feedback disappear and the student can select a different answer. This button only shows if more question attempts remain.
Show Give Up button
When clicked, answers will be displayed for the question and there will be no more Check Answer attempts. Users will not be able to submit alternate answers, even if Check Answer attempts remain. When enabled, Correct/Incorrect highlighting and Correct Answer are always shown when the student can no longer change their answer.
Enable required questions
This setting allows the user to allow required questions in the assignment. Select Enable, Use Question-Level, or Disable.
Points Deducted for Extra Selections
This setting only applies to items that have multiple responses enabled, such as a question that includes the instructions "Select all that apply." This prevents students from choosing all available options in an attempt to get points for the correct answer.
The default setting here is zero. If you decide to apply this setting to certain questions, make sure the points deducted makes sense with the point value of the item.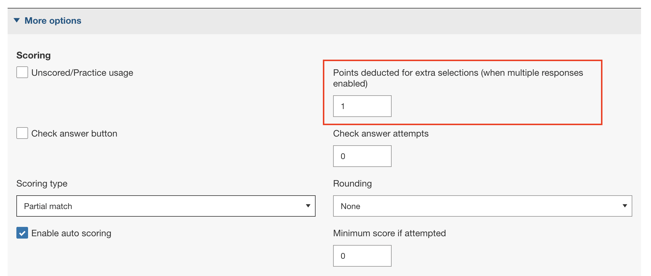
Figure 7: Points deducted for extra selections (when multiple responses enabled)
Feedback Timing
If you have configured your assignment to have feedback you can choose what feedback gets displayed and when.
Highlighting is configured for auto-graded questions and will be display based on what is set in the grid. Feedback needs to be specified under the More Options settings for questions in order to display regardless of what is set in the grid.
Some settings in the grid will be grayed out if other assignment settings are specified. For example, if grade server-side is set for the assignment, then answer highlighting and the correct answer will not be allowed to display.
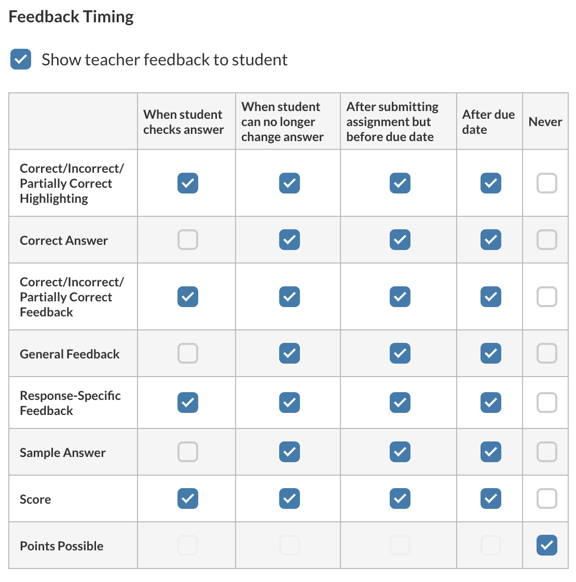 Figure 8: Feedback timing grid default settings
Show teacher feedback to student
The feedback that teachers have written in the LMS grader will be shown to students on the review screen.
When student checks answer
The information will be displayed whenever the student checks an answer.
When student can no longer change answer
The information will be displayed when a student can no longer change their answer. For example, a student has a question with 3 attempts on the questions. The student will not see feedback until after they have submitted their third question attempt and can no longer change their answer.
After submitting assignment but before the due date
The information will display in the student review screen after the student has submitted their assignment and will only display before the due date set on the assignment.
After due date
The information will display to the student in the student review screen after the due date has passed on the assignment.
Never
The information will never display.
Correct/Partially Correct/Incorrect Highlighting
When Check Answer is turned on, responses will be highlighted certain colors when students check their answers. Green is correct, Yellow is partially correct, Red is incorrect. The highlighting will not appear if Check Answer is turned off.
Correct Answer
This setting determines when students will see the correct answer for each item.
Correct/Partially Correct/Incorrect Feedback
In the edit page for each item, under More Options, instructors can add feedback based on the student's answer. Students will see the feedback that corresponds with whether they got the item correct, partially correct, or incorrect.
General Feedback
This is feedback that will be visible to students regardless of what answer they chose. If there is both General Feedback and Correct/Partially Correct/Incorrect Feedback, students will see both.
Response-Specific Feedback
Response-Specific Feedback matches the first feedback text field with the first multiple choice option, then the second feedback with the second multiple choice option, etc. This only works for some question types.
Sample Answer
Useful for open-ended questions or questions where you want to have a record of how it should be solved.
Score
The student's grade for the item/assignment.
Points possible
The maximum number of points a student could get on the assignment.
Enable hints
If hints are specified for questions they will display.
Item Pools
These settings allow you to configure a custom Item pool to show each student different Items during their assignment each time they take the assignment. This option is only recommended for more advanced users of the tool. See this article for more information on how to configure this option.
Access Restrictions
You can further restrict access to an assignment using an access code and by setting IP filter restrictions.
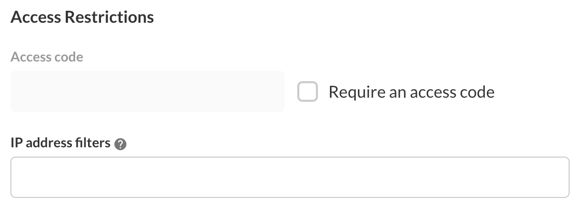 Figure 9: Access restrictions settings
Access code
You can toggle the Require an access code option to specify an access code that students will need to enter in order to access the assignment.
IP address filters
Access to an assessment is restricted based on the IP address of the user’s computer. Separate entries with a comma. Valid entries are a full IP Address or those in CIDR notation such as 192.168.1.1/20