
Getting Started with Atomic Assessments
In this guide, you'll learn how to create and assign assignments to students as well as how to grade and track student progress on those assignments. This guide is intended to just get you started with Atomic Assessments but there are many more features that are available.
TABLE OF CONTENTS
- How do I create an assignment?
- How do I assign an assignment to students?
- How do my students take an assignment?
- How do I grade an assignment?
- How do I track student progress?
If you would like to dive deeper, click on the links throughout this article to learn more and explore the portal to see all that Atomic Assessments has to offer!
How do I create an assignment?
You can create an assignment in multiple ways. The two most common ways are creating a standalone assignment that students will interact with as a Canvas Assignment or you can embed an Atomic Assessment into a Canvas page to blend interactive activities with other course content.
Creating an Assignment
Creating a standalone assignment is recommended if you want to create a test, quiz, or homework for your students.
- Navigate to Atomic Assessments in your course menu list
- In Atomic Assessments, click on the New Assignment button
- Choose Start with New Activity
- Enter a name for your new assignment (you can always change this later) and click Create Assignment
After specifying the name for your assignment, you will be taken to the list of Settings for your assignment. We will change these later. Next to the Settings tab, you will see another tab Content.
The Content tab is where you will author the content for your assignment. In Atomic Assessments, content is organized into Items so that you can re-use them in other assignments later. Once you have started creating Items in this assignment the Items tab will show a list of all of your Items for this assignment.

Figure 1: Items tab in a new assignment
Click on the + Create Item button to start creating an Item. You will be taken to a new screen to choose what type of item you want to create. For this example, we'll create a Multiple Choice - Standard question.

Figure 2: Create a new Item
The question editor will look similar for all question types. Each type will have a Compose Question section, a place to specify answer options, a section for selecting the correct answer (for questions that can be auto-graded), and more options where you can specify answer feedback and configure other settings. If you ever need help remembering what any of these settings do, click on the Help icon in the upper right of the question editor.
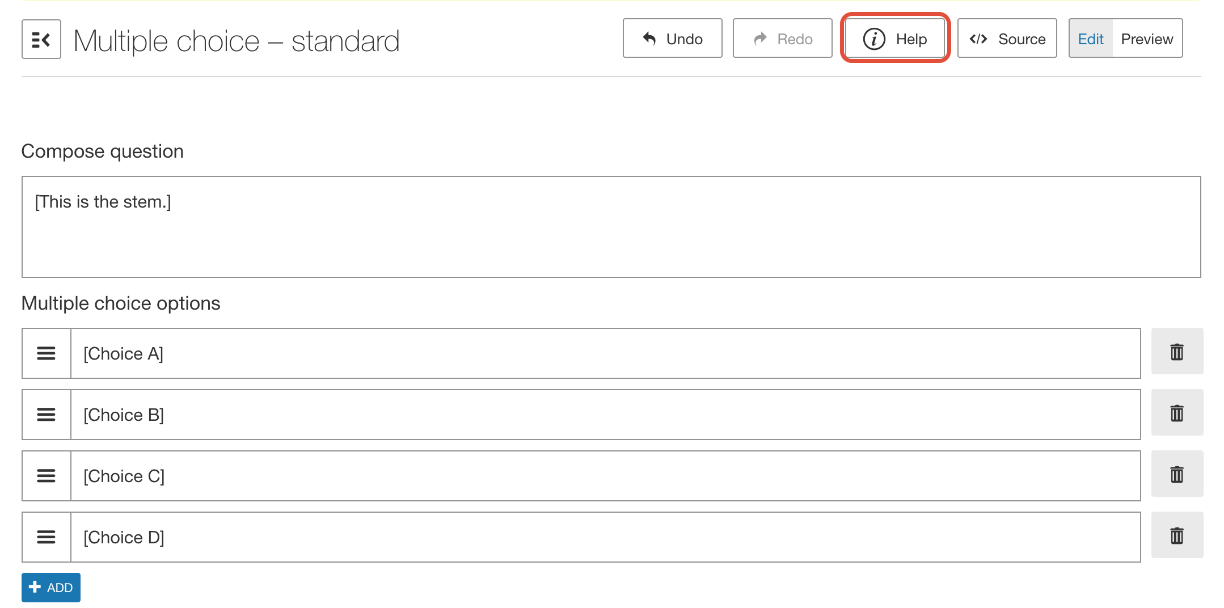
Figure 3: Question editor for Multiple Choice - standard, and the location of the Help button
Begin editing your question by entering a question stem in the Compose Question box. Next, configure your answer options under Multiple Choice options, you can add more options using the +ADD button and delete an option using the trash can icon next to an option. Rearrange the options by clicking and dragging on the three-line icon to the left of each option.
Set the Correct Answer by clicking on the correct option. You can also specify the number of points the correct option is worth. You have the option to set multiple correct answers and set different point values for Alternate Answers.

Figure 4: Multiple choice item with stem and answers added
Once you have finished editing your question and set your correct answer, Save the question in the top right of the editor.

Figure 5: Save a question
Once you save your question you will be taken back to your Item. From here, you can choose to add more questions by clicking the + button below your question or you can click on the Back button below the Items tab to go back to your Items list to create another Item.

Figure 6: Options after saving an item
Once you are done creating your questions, click on the Settings tab to configure your assignment settings. For this tutorial, we will just use the default assignment settings that are applied for new assignments. To learn more about each of the assignment settings and how they are configured see the article on assignment settings.

Figure 7: Locating the Settings tab
Once you are happy with the settings, click on the Save button to save your assignment. You can preview your assignment to see how it looks to a student using the Preview icon in the upper right.

Figure 8: Locating the Preview button
To Publish your assignment, click on the circle-backslash symbol next to the preview button. You can hover over each button in the upper right to see what each button does.

Figure 9: Publishing the assignment
When you save an assignment in Atomic Assessments, a Canvas Assignment will be generated. This Canvas assignment is how your students will interact with your Atomic Assessments assignment. You can see how it looks for students by using the Canvas Student View feature, clicking on Assignments in the left-hand navigation, and selecting the Assignment you just created.

Figure 10: Viewing the Atomic Assessment in the Canvas Assignments menu
Embedding an Atomic Assessment in a Canvas Page
You can create interactive content by embedding Atomic Assessments into a Canvas Page. This is commonly used to create student understanding checks and to increase student engagement with the material. You can have these activities be graded or ungraded for student practice.
- Navigate to the Canvas Page you want to embed Atomic Assessments into.
- Edit the Canvas Page.
- Select the External Tool button in the Rich Content Editor (See Figure 11)
- Click View All and choose Atomic Assessments.

Figure 8: Using the Apps tool to embed an Atomic Assessment
You will be given the option to create a new activity to embed or you can choose one that you have already created.
For this tutorial, we will Start from an existing activity. Click on the name of the activity that you want to embed. If you followed the Create an Assignment section above then you can click on the name of the activity you just created.
Clicking on the name of the activity will bring you to the Assignment Settings page.
If you want to create a graded activity, then make sure to select the Create Gradebook entry option located underneath the Assignment name BEFORE you Save the assignment. Once your assignment has been saved you will not be able to change this setting.
Click Save to save the assignment and embed it on the page. Then, Save the Canvas Page.
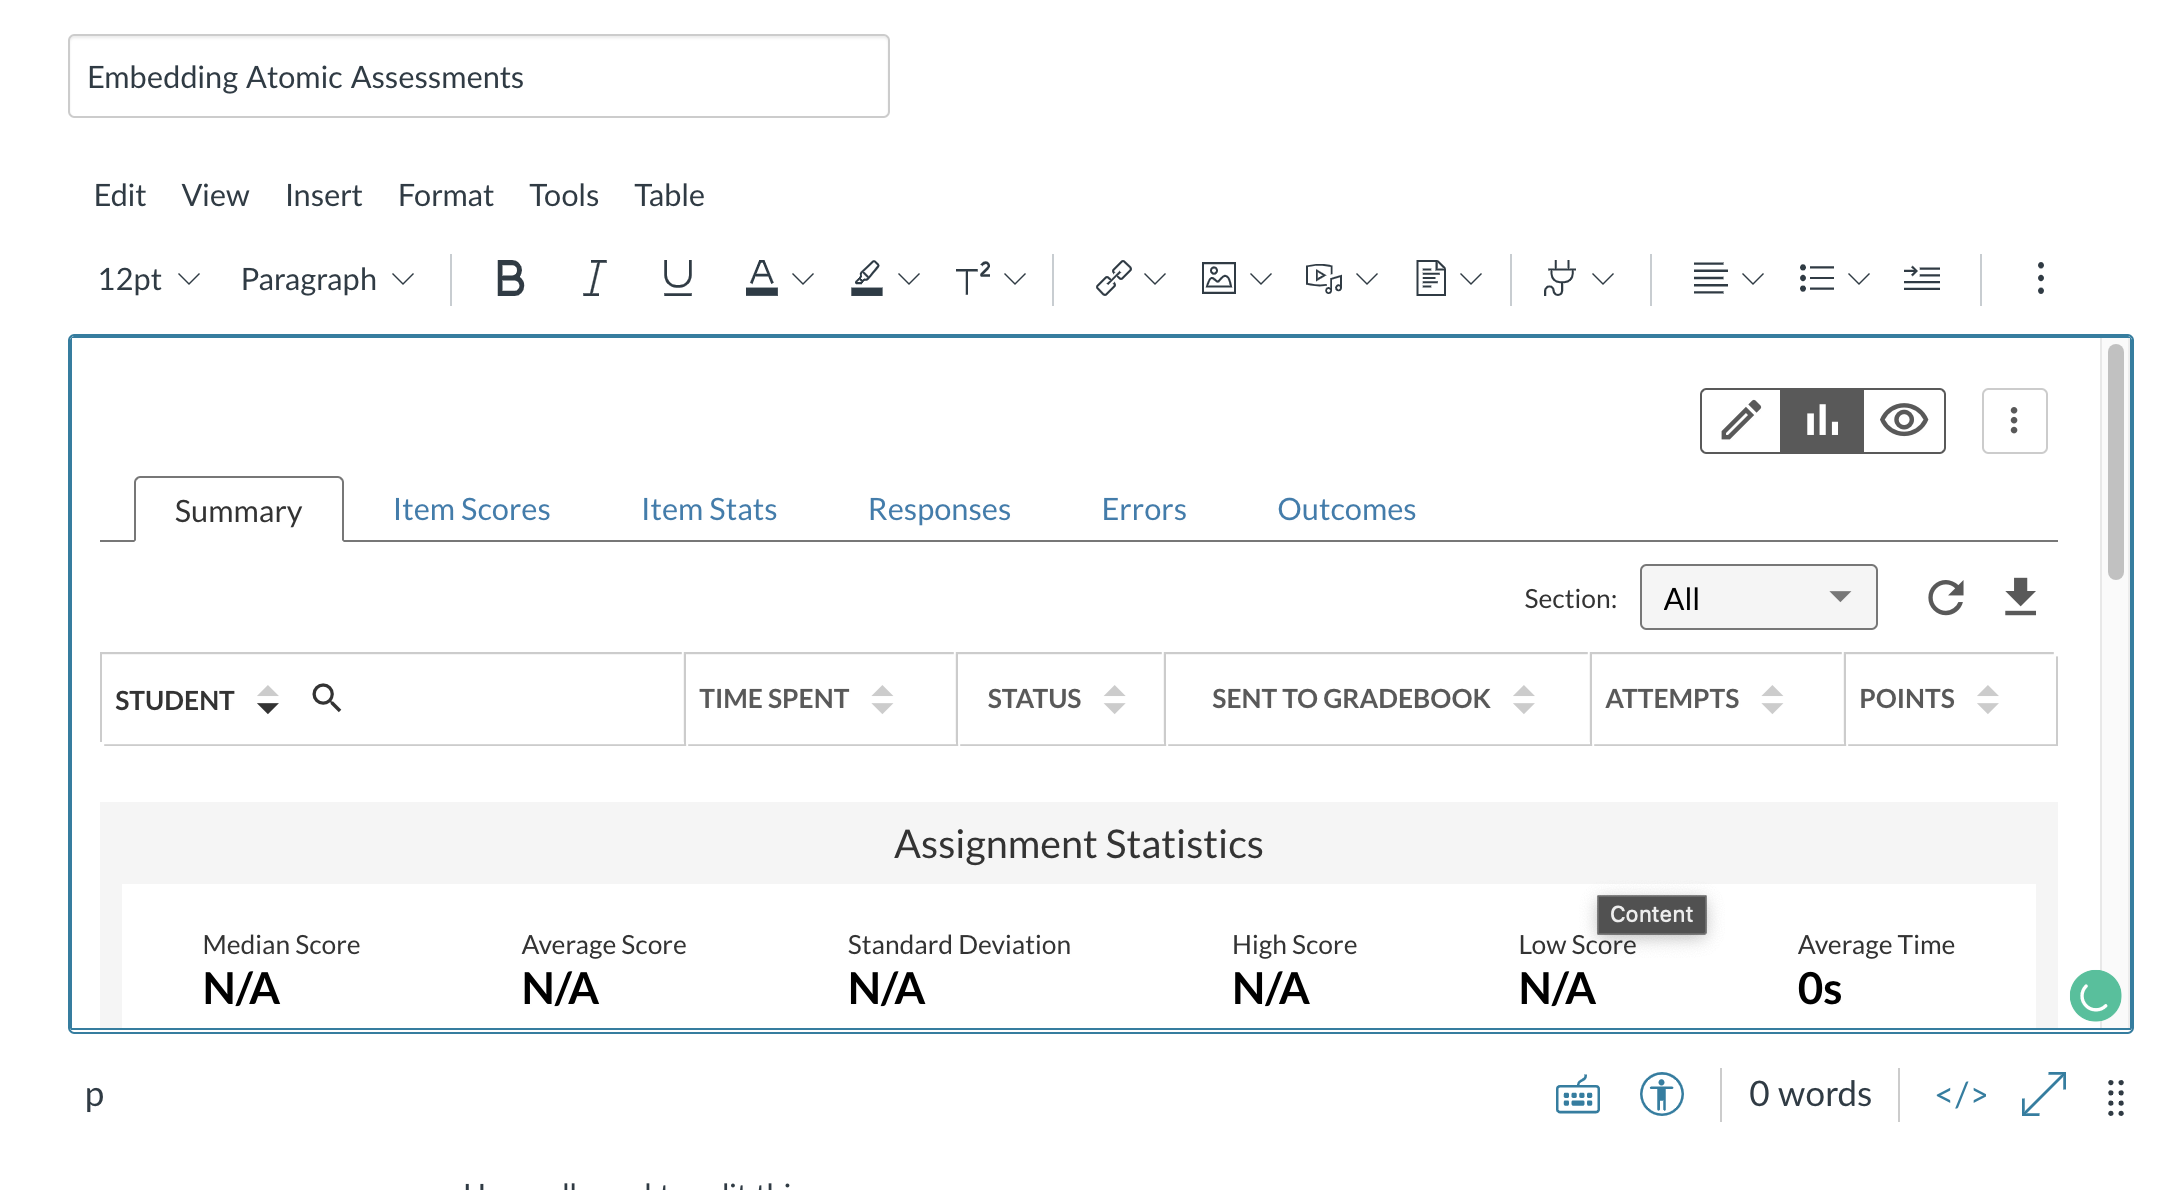
Figure 9: An embedded activity in a Canvas Page prior to saving the Canvas Page

Figure 10: An embedded Atomic Assessment after saving the Canvas page
You can edit content in the embedded activity within the Canvas Page or in Atomic Assessments directly. Embedded activities will show an embed icon next to it in the assignment list in Atomic Assessments.

Figure 11: Embedded activities will show the embed icon to the left of your title
How do I assign an assignment to students?
Overrides allow you to set multiple, distinct assignment terms to accommodate different students and sections that have access to the assignment.
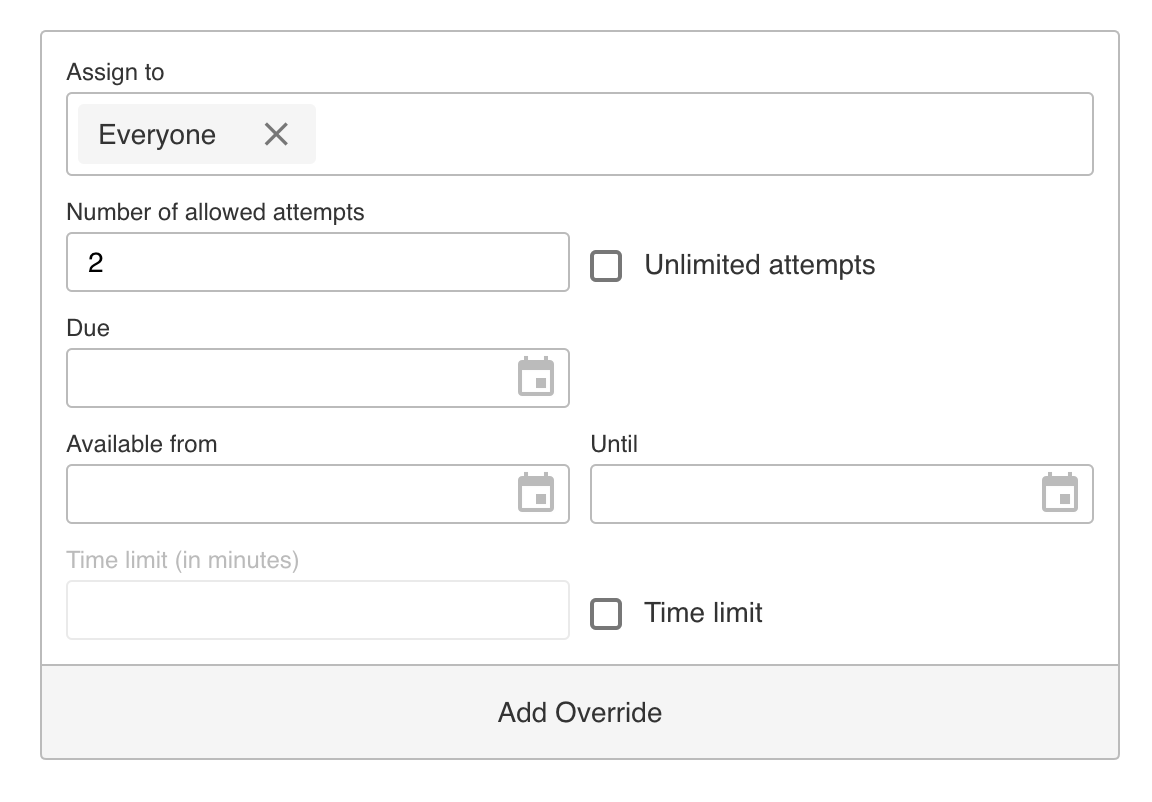
Figure 12: Assignment Override box
Settings set in the Override box will only apply to those specified students. You can add additional Overrides by clicking the Add Override button.
By default, an assignment is configured for "Everyone". To add a student or section, you can type their name in the Assign to section.
For more information on what each setting means review the settings configuration article.
How do my students take an assignment?
Students are able to access Atomic Assessment content through a Canvas Assignment or on any Canvas Page that has an embedded Atomic Assessment. Students can only view published Atomic Assessment assignments in courses that they are enrolled in.
Depending on the assignment configurations, students can experience different interfaces while taking an assignment.
How do I grade an assignment?
You can adjust student grades and provide feedback for student submissions using the SpeedGrader. Once you have finalized grade adjustments you can send the finalized grades to the gradebook to alert students of the posted grades.
See this article to learn more about accessing the Speedgrader and sending grades to the gradebook.
How do I track student progress?
Assignment reports show student performance on an assignment. They can also help you evaluate the difficulty and quality of individual assessment items.
Summary Report - Information about student submissions for an assignment.
The summary report shows time spent, status, sent to gradebook, number of attempts, and points earned per student.

Figure 13: Summary report
Item Scores - Student scores on items and questions in an assignment.
The item scores report shows time spent, score earned, and points earned for each item per student.

Figure 14: Item Scores
Item Statistics - Statistics for each item (question).
Item Stats shows the descriptive statistics for each item in the assignment.

Figure 15: Item Stats
Responses Report - Details and trends on each response.
The responses tab shows the breakdown of responses per question.

Figure 16: Responses report
Errors Report - Information on any errors occurring in an assignment.
Outcome Report - Student performance on items tagged with Level 1-3 tags.